Happy Labor Day 2012!
My kiddos start back to school this week and thankfully, they are really excited to go back. (I guess watching me decorate cookies all summer wasn't exactly their idea of fun)!??!
Here's something FUN to do with your own kids. Don't forget to send some in to their teachers!!
APPLE CAKE POPS~ (yummy and adorable)!!!
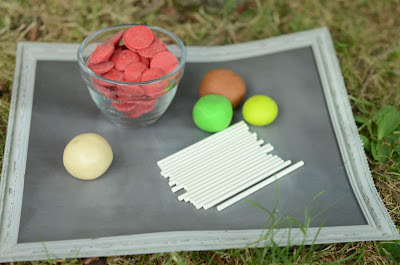
Here's what you'll need~
red candy melts
lollipop sticks
home made/store bought cake
container of icing
fondant
food color~ green, brown, yellow
edible eyeballs
parchment paper
baking tray
styrofoam (for drying your pops)
Crisco shortening (optional)
You'll only really need the red candy melts but if you want to add the worm, stem, and leaf buy a small pack of fondant.
First make the stems, leaves, and worms. Attach the eyes by brushing a very small amount of water or vodka onto the worms head. Press down gently on the eyes until they are set. Leave these aside to harden.
Mix (by hand or with an electric mixer) cake and a small amount of icing. Add just enough icing so that you can easily form balls out of your cake mixture. Be sure to add the icing just a little at a time, if you add too much you will have a mushy mess!!!
Form small, round cake balls. (I flatten one end to give it the apple shape). Put them on a baking tray lined with parchment paper.
Place these in the refrigerator for 10-15 minutes to firm up.
In the meantime, melt your red candy melts in the microwave (30 seconds at a time, stirring). Or on the stove in a double broiler.
Once melted, stir in a tsp. or so of Crisco shortening to keep the chocolate from firming up too quickly.
Take the cake balls out of the refrigerator. Dip the end of a lollipop stick into the melted chocolate then stick it into a cake ball. (This will help the stick stay put).
Dunk the cake pop into the melted chocolate. When you pull it out, let the excess chocolate drip back into the container.
Stick your cake pop into styrofoam to dry.
Quickly take a fondant worm and push it into the side of your apple. Hold it there for 15-20 seconds to make sure it isn't going anywhere. Now place the stem and leaf on top, pressing them into place.
Once you finish your apple pops put them back in the refrigerator until you're ready to serve them.
Look how cute they turn out!!!
and they are delicious too, just ask Kati!! ; )
Here's the back to school table I put together for the Fall 2012 issue of
Bird's Party Magazine. I had such a fun time planning this and the best part is that it was SO affordable. You might be tempted to do this for your own kids, or for a teacher appreciation luncheon. You could even take the basic layout and turn it into a sweet table for a birthday party. Here's what I did. . . .
I bought these small flower pots at Michaels craft store for a party I had last year. I re-purposed them by spraying them with chalk board paint. And they only needed one coat! I made the pinwheel cookies which you can order by emailing me
here. Or make your own cookies on a stick and pop it into a small piece of styrofoam (why not use the leftover styrofoam from drying your apple pops)!
These adorable
favor boxes open just like a real lunch box and were made by Do Driver, the creative force behind
Piggy Bank Parties. She can make anything into a favor box and her prices...well, her name says it all...You pay just $9 for these and can print out as many as you need!!! I added the name tags that I found at Michaels in the dollar bins. And the ribbon (also from Michaels) I used a 40% off coupon that they send you every week if you subscribe to receive their emails.
OK, not everyone has the time, energy, or need to refinish a desk just for a party. We actually needed a desk for my younger daughter so it was a win, win for us when I found this gem at a rummage sale for $15! It was old, brown, and beaten up but all it needed was a little TLC. OK, it actually needed serious sanding, 2 coats of primer and around 6 coats of spray paint. I used chalk board paint on the top. ( I really got a lot of use out of just 1 can. The desk, pots, and the "black board").
The reason I have it in quotes is that this is not a real blackboard, well at least it wasn't when I started. Here's what I did~
I bought poster board sized, foam board at Dollar General (my favorite dollar store). I sprayed it with the chalkboard paint and voila'! Yes, I know that spray paint melts foam board but I only paid a dollar for it so it was worth trying out. Just make sure you keep away from the edges or at least spray them very lightly. Your finish will not be perfect because, like I said spray paint and foam board are not friends. I just took a chalk dust-filled eraser and went to town erasing. This covered up any evidence of my crime!! ;))
The bunting sign below took all of 20 minutes to make. I buy rolls of craft paper at the dollar store and use it for everything: drop cloths, coloring/painting with the kids, wrapping the books I have the cake pops displayed on, wrapping gifts, making cute bunting signs!! I bought the stamp set at Michael and hung it on twine. My favorite place to buy twine is
The Twinery.
These cookie, drawer pulls are one of my favorite parts of the display. I baked apple-shaped sugar cookies upside down, with a lollipop stick (cut in half) sticking straight out of the back of it. I slid this into the hole left when I removed the original drawer pull.(crazy or pure genius)!?!?!
I hand painted all of the apple cookies with food coloring thinned with a tiny bit of vodka {hiccup!!!}
Well, good luck with the new school year....or with making the apple pops, or with creating your own magazine-shoot worthy party on a budget!! You can always email me with any questions. xo
As always, gorgeous photography by~
Expressions by Nicole Marie
This post is linked up on Piggy Bank Party's
Silly Sunday link party!! : )
.