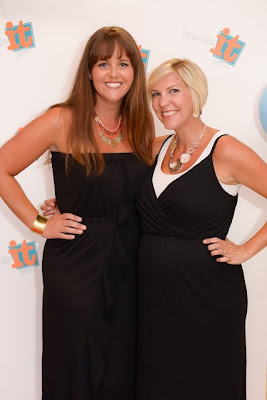
Hey, guys! So do you remember the
kitchen/dining room makeover that I told you we had done? It was televised and SO much fun... I can't think of anything I didn't love about the experience. One of the best parts, besides my awesome new work space, was meeting local bloggers and TV hosts, Monica and Jess. Their blog,
East Coast Creative is the inspiration for their new TV show,
Knock it Off! On the show they take what seems like a hopeless cause-of-a-room (ie; my kitchen) and transform it using their amazing and affordable DIY techniques.
While filming my episode we were casually discussing the show's premiere party when I realized that they were planning the entire event themselves...between juggling a TV show, a blog and their families?!! That's when I stepped in...
Welcome to The Knock it Off Premiere Party!
Up until this point I had only styled small, family parties. This party had over 200 guests!!! It was a collaborative effort by so many amazing businesses. Check it out...
Monica and Jess greeted their guests at the door. It was a great way to make sure they could meet everyone who came to their party without missing anyone. These amazing, huge tassel balloons by Tara from
One Stylish Party adorned the entrance. The tassels reflect the color scheme that ran throughout the party... orange, turquoise, and lime green are the colors from the show's logo. I threw in the tan/craft paper to represent the DIY aspect of the show.
See the red carpet and backdrop in the background? Guests felt like VIP's as they posed for photos...
Lauren, the amazing talent behind
ten23Designs created the vinyl logos for this step and repeat backdrop. So glam...
even Monica and Jess got in on the action!! (How cute is Jess's baby bump!!)
And what's a premiere without a marquee sign? (I made this sign for less than $30!!)
Don't you love this pinwheel banner by Jaclyn of
Peckled? You can make a big statement with a banner, and pinwheels like these are really popular party decorations right now.
We had a huge space to decorate so I used pinwheels several different ways. These sparkly, logo pinwheels made by Valerie of Greyson Design were hanging from the ceiling. They added such a fun pop of color.
How SWEET is this custom chalkboard sign?!! Nikki from
Nikki, In Stitches is the most creative person I've ever met! (she's even been on Craft Wars on TLC!!) She made all of the chalkboard signs for the party: food, drinks, and sweets.
We went through LOTS of cupcakes! I made vanilla, chocolate, and oreo mini cupcake bites, sugar cookies, and chocolate-dipped marshmallows. The signs were so much fun to make and practically free to do. I just hand stamped paint stirrers from the paint store...
I made the table runner using a roll of dollar store craft paper and this beautiful, ruffle garland made by Jenny from
Craft That Party. Jenny also made these precious peg dolls of Monica and Jess...
Here's a cool side by side:
After the guests had a chance to mingle and eat it was time to watch the premiere!! Everyone grabbed some kettle corn and settled in for the show...which is amazing by the way!!
I found these cute, scalloped popcorn containers at Oriental trading.
Another inexpensive...well...free way to decorate is to cut up paint samples in coordinating colors and string them on twine to use as bunting.
The popcorn "table" is actually a door that I painted to mimic the one in the show's logo...
These lollies and mini tool key chains (that actually work!) were take home favors for the guests. To make the centerpieces, I filled these little, clear paint buckets from
Oriental Trading with floral foam, crepe paper, and glow lights, so they would glow in the dark. Then I popped in delicious, custom lollipops with the show's logo on them. They were made by Cheryl of
Vintage Confections. She creates edible works of art and has been featured in Brides Magazine as well as Martha Stewart Living. I used double stick tape to add these adorable, glittery logo flowers by Valerie of
Greyson Design to tie it all together.
Knock it off!!! These are so cute!!!
Hope you liked it!! We did!! xo
Helpers~ I chose these shops because each is professional, has the highest standards in the quality of their work and an amazing eye for detail.
Find their shops here:
Photographer ~ Nicole of Expressions by Nicole Marie
Me and Nicole :)
Peckled~ pinwheel decorations and sign
Nikki, In Stitches~ chalkboard signs
Greyson Design~ logo pinwheels, centerpiece logo flowers, mini bunting, water bottle labels
Vintage Confections~ custom logo lollipops
Craft That Party~ custom peg dolls, crepe paper ruffles
One Stylish Party~ huge tassel balloons
ten23Designs~ custom vinyl logos
Oriental Trading~ red carpet, glow sticks, scalloped popcorn containers, small paint cans, mini tool key rings, turquoise napkins
Oriental Trading provided products for this event. All opinions are my own.
.


